Navigate360 for Staff

Navigate360 is a user-friendly tool designed to help streamline communications with students, schedule appointments, and track student progress. Faculty and staff connect to their students and to one another, providing timely and effective support.
For information on training workshops and drop-in support, please check our calendar of events.
- Have access to student profiles and academic performance.
- Easy to message students and arrange appointments.
- Simplified availability setup that syncs with your John Jay Outlook Calendar.
- Track student progress to inform advising.
- Join the coordinated care team to provide efficient and timely support to your students.
You can log into Navigate360 using your CUNYfirst credentials.
If you need to expand your current role within the Navigate360 system, please fill out CUNY Navigate360 User Access Request Form. Include the rights that will be needed in Navigate360 to fulfill your job role. Have your manager or supervisor fill it out and sign as well, then email the form to Katherine Killoran at kkilloran@jjay.cuny.edu.
Whenever you click a student’s name, you will automatically be redirected to their profile page. The 'Student Profile' shows key details about a student, such as their major, class standing, and assigned staff.
Student Overview
- The ‘Overview’ tab gives you quick insight into the student’s performance and potential needs.
- At the top, highlighted in blue, you will see a quick breakdown of their credits earned, GPA, and other areas of potential need.
- Below is an overview including their major history, EMPLID, class standing, academic standing, and most recent enrollment.
- Scrolling down you may also see their categories and more information on any minors, holds, cohorts, etc.
Image
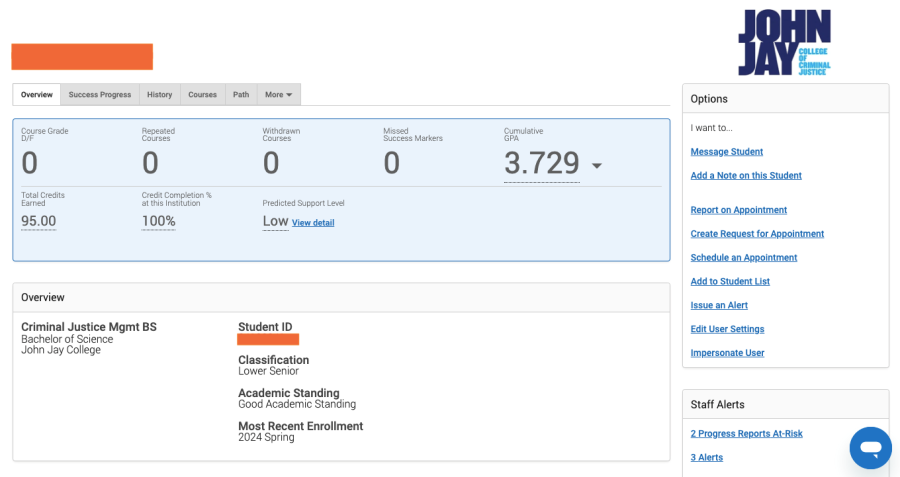
- On the right-hand side, you will see the ‘Options’ menu for quick actions such as adding the student to a list, messaging them, issuing an alert, and more.
- The ‘Staff Alerts’ will show any Progress Reports or Alerts issued for the student.
- Under ‘Your Success Team’ you will be able to find and message directly any staff members assigned to the student.
Student Profile Features
- The ‘Success Progress’ tab helps you visualize the student’s performance and progress over time.
- The ‘History’ tab will show you previous appointments, alerts, progress reports, or to-do items issued for the student.
- The ‘Courses’ tab shows a breakdown of all classes and credits taken by the student, including grades and upcoming semesters.
- The ‘Appointments’ tab shows a history of all previous or future appointments associated with a student. You can also see any comments or meeting notes made by other staff regarding an appointment.
Student Success Markers (coming soon)
On your homepage, you will see all your current students under 'Assigned Students.' From this section, you can message students, create campaigns or student lists, or open a Student’s Profile page.
Finding and Creating Student Lists
If you wish to find, message, and track analytics for larger groups, such as students in your programs or cohorts, you can create a ‘student list’ to manage them more easily. All your pre-existing student lists can be found on the left-side menu, under 'Lists & Saved Items.’
The easiest way to add a list of students to Navigate360 is by uploading a list from Excel, but you can also search and add students to your lists from Navigate360 directly. To upload a student list from Excel:
- Make sure to have an Excel file ready to be uploaded into Navigate360:
- Save the file as an .csv file. You can do this by selecting 'File' > 'Save As' and selecting CSV (Comma Delimited). For ease of upload: we recommend your file contains only the student EMPLIDs in the first column.
- Once you have your file ready, log into Navigate360.
- On the left-side menu, select 'Lists & Saved Items.'
- Click 'Actions,' then select 'Upload Student List' from the drop-down menu.
- Scroll down and click 'New Student List.' Name the list accordingly and confirm.
- Choose the file from your computer and upload it to Navigate360.
- Select the column from which you want to import the student EMPLIDs from.
- Once saved, this list will become available among your student lists.
Messaging Students
- Staff members can send email and text messages to students individually or in groups. When looking at your 'Assigned Students,' or any student list: select the students, click ‘Actions,’ and select ‘Send Message.’
- For more information, please consult our Guide to Messaging Students on Navigate360 .
NOTE: All correspondence or reports sent through the platform become part of the student's educational record and are therefore covered by FERPA. Please refrain from sending any messages containing confidential or personal information.
- On Navigate360, you can set your availability to create meeting appointments with students.
- Your availability lets you indicate the days, times, locations, and services offered when meeting with students.
- For more information, please refer to our resources for staff guide for scheduling appointments (coming soon).
Setting Up Your Availability
For students to be able to schedule appointments with you, you must have at least one availability set up. You will be able to share your Personal Availability Link with students for them to make appointments. You can also sync your John Jay Outlook calendar to Navigate360 to manage your times and appointments more easily.
- To set your availability, go to your Faculty/Staff Home and click ‘My Availability’. You should see a table of existing Availabilities, if any, and your Personal Availability Link.
- Open the Actions menu, then select 'Add Time.’
- In the 'Add Availability’ menu, choose the days and times of the week you are available, and the dates you wish the availability to be active. Select from menu options to edit your availability based on your needs.
- Click 'Save’ to create the availability. Repeat this process any time you want to add another availability.
Editing Existing Availabilities
To edit an existing availability, click the 'Edit' button next to the entry you want to change. To delete an availability, simply select the time, open the 'Actions' menu, and click 'Delete Time.'
Syncing Your John Jay Outlook Calendar
Integrating your Outlook calendar with the Navigate360 platform allows you to pull in Free/Busy times from your personal calendar and push appointments scheduled in Navigate360 to your personal calendar. If you are making appointments with students, sync your calendar so that students cannot schedule an appointment during times marked 'busy' on your Outlook calendar.
- First, you will need to set up your permissions within Outlook. For this, make sure you are using the Outlook Web App on your computer. Once you are signed in to your John Jay email, click on the Calendar tab:
- Go to 'My Calendars' and right-click on your personal Outlook calendar. Select 'share,' then 'Calendar Permissions.'
- In the pop-up box, click ‘Add.' Type in EAB Navigate, select navigatesupport@jjay.cuny.edu and ‘Add.'
- Once you’re back on the Permission list, select EAB Navigate Support. Change the permission level to 'Editor,' then select 'OK.'
- Now that Outlook permissions are updated, you can sync your calendar on Navigate360. Log in on Navigate360 and click on the 'Calendar' icon on the left-side menu.
- Click on 'Settings and Sync.'
- Select 'Setup Sync,’ then 'Outlook Service Accounts.'
- You will see a pop-up message letting you know the calendar is syncing, this may take a few minutes. Once your calendar is synced, items should update almost instantaneously, and you will not need to sync it again unless there have been other issues.
Writing Meeting Summaries
- Once you have met a student, complete a Meeting Summary to record their progress for future reference.
- These reports can be seen by other staff members and used to provide better support based on what topics have already been discussed with a student, areas of interest, or any other feedback given.
- Please refer to our resources for writing Meeting Summaries and be mindful not to include any confidential or sensitive information in your feedback.
The Navigate360 Coordinated Care System allows staff and faculty members to coordinate student support more effectively. Each student has their own ‘Success Team’ assigned to them each semester, providing support and outreach.
Coordinated Care Unit
When looking at a student’s profile page, you will see their coordinated care unit under ‘Your Success Team,’ on the right-hand side. If you wish to contact any of these faculty or staff members, click on the email icon under their name to craft and send a message directly.
Students are assigned different staff and faculty members based on their cohorts, classes, and groups. If you're unsure who to message, the student’s ‘Support Coordinator’ will be the main source of support for the student. Some of the staff & faculty members you may find in a student’s coordinated care unit are:
- Professor - the student’s current professors.
- Advisor - the academic advisor assigned to the student.
- Support Coordinator - staff member who is the main source of support for the student, and the person responsible for responding to Alerts.
- Progress Report Case Manager - responsible for meeting with the student to support them with any Progress Report concerns.
- Peer Success Coach - in some classes, students are assigned a PSC to support them.
- Athletics - coach or athletics lead for students in athletics.
Progress Reports
Once a semester, faculty members will be asked to fill out Progress Reports on different student populations. This tells staff of any areas the student may need support in. The student’s Progress Report Case Manager can then offer their dedicated support, helping the student based on this feedback sent by faculty.
- If you are a student’s Progress Report Case Manager, you are responsible for providing support for that student for the issues they were specifically flagged for.
- To respond to Progress Reports, you should create an appointment campaign to meet with your students who were marked as at-risk.
- During the meetings, help create strategies for their success, point them to resources, and follow-up on their progress since the report was issued.
Use the following resources to set up your appointment campaign and respond to Progress Reports:
- Creating Appointment Campaigns and Responding to Progress Reports
- Progress Reports Fall 2024 Timeline
- Progress Reports Official Protocol (coming soon)
Alerts
Unlike Progress Reports, Alerts are ongoing and can be sent out at any point in the semester. Once an alert is issued, the corresponding office or the student’s Support Coordinator will be assigned to help support the student through immediate action.
NOTE: Alerts should never be used in place of safety or health concerns and emergencies.
If you are a student’s Support Coordinator, you will be responsible for resolving Alerts when a case is opened. Alerts you are responsible for can be found under the ‘Cases’ tab on Navigate360’s left-hand menu. Your role is to support students who receive alerts through immediate action by attempting to contact and support them accordingly.
- Responding to Alerts
- Alert Response Protocol (coming soon)
- Referrals (coming soon)
While individual student information can quickly be found through their Student Profile, there are also features that allow you to analyze larger cohorts, students in specific classes or majors, students from one of your lists, or students assigned to you.
Finding Students Through Advanced Search
Advanced Search is a search function in Navigate360 that lets you find unique cohorts of students based on your own customized filters. Advance Search can be found on the left-side menu. Within Advanced Search, use the drop-down menus to add and layer filters based on what types of students you are looking for. Here are some examples:
- Click 'Student Information,' then 'Student List' to select from a pre-existing list of students you wish to look at.
- You can look at 'Performance Data' and add a Max. Cumulative GPA to find all students with a lower GPA than you selected.
- You can select 'Course Data' to find students who are registered to one or more specific classes or sections.
- Select ‘My Students Only’ to search from only your current assigned students.
- After you have selected what you wish to find, simply click 'Search,' and you’ll receive an updated list with the student fitting the selected criteria. You can add them to a new list, message them, export the results to an Excel file, etc.
Using Reports to Track Progress
Reports allow you to track data and analytic insights within Navigate360 features. Reporting is a helpful tool for staff tasked with pulling analytics related to their programs. You can access ‘Reports’ by selecting the corresponding icon on the left sidebar.
- Select ‘Standard Reports’ to generate a new report. You can create reports based on appointments, alerts, progress reports, enrollment, and more.
- Once you have selected the type of report, you can add filters to create your search and optimize your results based on your needs.
- Select ‘My Students Only’ to search from only your current assigned students.
- Select ‘Run Report’ and wait for the report to be created.
- Once your report has been completed, you can import those results, turn them into a student list, message students fitting the selected criteria, create an appointment campaign, etc.